Seed Starting Secrets for a Bountiful Garden
Are you looking to start a beautiful and productive garden from scratch? Germinating and planting seeds can be a rewarding and cost-effective way to grow your own plants. In this ultimate guide, we’ll cover everything you need to know about how to germinate seeds, including starting seeds indoors, and plant them successfully to create a thriving garden.
Preparing to Germinate Seeds
Before we dive into the germination process, it’s important to gather the necessary supplies and understand the factors that influence seed germination.
A. Choosing Seeds: Purchase quality garden seeds from us or another reputable supplier to ensure healthy and strong plants. Look for seeds that are well-suited to your climate and growing conditions.
B. Gather Materials: You’ll need a few basic materials for germinating seeds, including: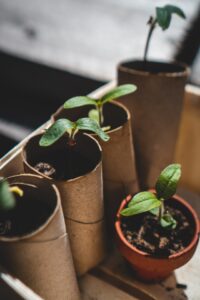
- Seedling trays or small containers
- Seedling soil mix or peat pellets
- Plastic wrap or a propagation dome
- Spray bottle for watering
- Heating mat (optional)
C. Create the Right Environment: Seeds require specific environmental conditions for germination, including:
- Adequate moisture
- Suitable temperature range
- Proper oxygen levels
How to Germinate Seeds Step-by-Step
Now that you’re prepared, let’s dive into the step-by-step process of germinating your seeds.
A. Fill Containers with Soil: Fill your seedling trays or containers with the seedling soil mix or expand your peat pellets according to the package instructions.
B. Sow the Seeds: Plant seeds at the appropriate depth, which will vary depending on the type of seed. Generally, seeds should be planted 2-3 times as deep as their size. Space seeds out evenly in the container, following the recommended spacing guidelines.
- Sowing Large Seeds: For larger seeds like beans, corn, or squash, plant them individually in seedling trays or containers. Use a dibber or your finger to create a hole in the soil at the appropriate depth, as mentioned on the seed packet. Place the seed into the hole and gently cover it with soil. Press the soil lightly to ensure good seed-to-soil contact.
- Sowing Tiny Seeds: Tiny seeds, such as lettuce, carrots, or flowers, can be more challenging to sow individually. Instead, you can broadcast them evenly across the soil surface. To achieve this, mix the tiny seeds with a small amount of fine sand or vermiculite to help disperse them. Then, sprinkle the mixture over the soil surface. Gently press the seeds into the soil using the palm of your hand or a flat object like a small board. Since tiny seeds require light to germinate, do not cover them with soil. If needed, you can cover them with a thin layer of vermiculite to help maintain moisture.
C. Cover Seeds and Maintain Moisture: Cover the seeds lightly with soil or vermiculite and gently mist the surface with water using a spray bottle. Maintain consistent moisture by covering the containers with plastic wrap or a propagation dome.
D. Provide Warmth and Monitor Temperature: Place the containers in a warm area or use a heating mat to maintain the optimal temperature for germination, which varies by plant species. Check the seed packet for specific temperature requirements.
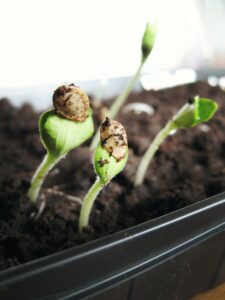
E. Observe and Wait for Germination: Monitor your seeds daily for signs of germination, such as the emergence of seedlings. Remove the plastic wrap or propagation dome once the majority of seeds have germinated to prevent mould growth and improve air circulation.
Common Germination Problems
Seeds Not Germinating
There could be several reasons why your seeds aren’t germinating. Identifying and addressing these issues can help you improve your germination success rate.
- Seed Viability: Seed viability can be a concern for some gardeners, especially when using older seeds or seeds of unknown origin. While it is true that some seeds can remain viable for years if stored correctly, other seeds may have a shorter shelf life. To ensure successful germination, it’s a good idea to use fresh seeds or seeds that have been stored properly in a cool, dry, and dark place.
If you’re unsure about the viability of your seeds, you can perform a seed germination test by placing a few seeds between moist paper towels and observing whether they germinate within the expected time frame. This will give you a better understanding of the germination rate and help you decide if you need to purchase new seeds or adjust your planting strategy. - Environmental Factors: Environmental factors, such as temperature, moisture, and light, play a crucial role in seed germination. Seeds not germinating could be a result of improper environmental conditions. Ensure that you are providing the optimal temperature for your specific plant species, as indicated on the seed packet. Additionally, maintaining consistent moisture levels is vital, as overly dry or wet conditions can inhibit germination. For seeds that require light to germinate, make sure they are sown on or near the soil surface and exposed to sufficient light.
Seedlings Dying After Sprouting
It can be disheartening to see your seedlings die after putting in the effort to germinate them successfully. Understanding the common reasons for seedling failure can help you prevent these issues and ensure the survival of your young plants.
- Damping Off: As previously mentioned, damping off is a fungal disease that affects seedlings, causing them to wilt and die. Seedlings dying from damping off can be prevented by using a sterile seedling mix, maintaining good air circulation, and avoiding overwatering. Monitoring soil temperature and keeping it consistent can also help reduce the risk of damping off.
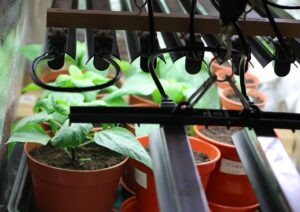
- Insufficient Light: Seedlings require adequate light to grow strong and healthy. Seedlings dying after sprouting may be due to a lack of light, causing them to become weak and leggy. To prevent this, place your seedlings in a sunny location, or use supplemental grow lights if natural light is insufficient. Make sure to provide 12-16 hours of light per day, followed by a period of darkness to mimic natural day-night cycles.
- Overwatered Seedling or Underwatering: Both overwatering and underwatering can lead to seedlings dying. Overwatering can cause root rot and suffocation, while underwatering can result in dehydration and stunted growth. To maintain proper moisture levels, water your seedlings when the soil surface feels dry to the touch, and avoid letting them sit in standing water.
- Nutrient Deficiency: Seedlings can also die due to a lack of essential nutrients. Initially, seedlings rely on nutrients stored within the seed, but they will eventually need additional nourishment from the soil or fertilizer. To ensure your seedlings receive the nutrients they need, use a quality seedling mix or apply a balanced, water-soluble fertilizer at the recommended rates.
Starting Seeds Indoors
Starting seeds indoors can give your plants a head start, especially for varieties with a longer growing season. Here’s how to germinate seeds and grow them indoors before transplanting them outside.
A. Choose the Right Time: Consult the seed packet or a planting calendar to determine the appropriate time to start seeds indoors. This will usually be several weeks before the last frost date in your area.
B. Follow Germination Steps: Follow the steps outlined above in the “How to Germinate Seeds Step-by-Step” section, making sure to provide the right environment for germination and growth.
C. Provide Light: Once the seeds have germinated and the seedlings begin to grow, they will need plenty of light. Place the seedlings near a sunny window or under artificial grow lights, adjusting the light source to maintain the proper distance from the plants.
D. Fertilize Seedlings: As the seedlings grow, they may require additional nutrients. Use a diluted liquid fertilizer according to the package instructions to provide the necessary nutrients for healthy growth.
Planting Seeds: Transplanting Seedlings to the Garden
Once your seeds have germinated and grown into small seedlings, it’s time to transplant them into your garden.
A. Harden Off Seedlings: Gradually expose your seedlings to outdoor conditions by placing them outside for a few hours each day, increasing the duration over a period of 7-10 days. This will help them acclimate to the new environment and reduce transplant shock.
B. Prepare the Garden Bed: Choose a suitable location for your plants based on their sunlight, water, and space requirements. Prepare the soil by loosening it with a garden fork and adding compost or other organic matter if needed.
C. Transplant Seedlings: Carefully remove the seedlings from their containers, being mindful not to damage the roots. Dig a hole in the prepared garden bed and place the seedling in it, ensuring the root ball is covered with soil. Gently firm the soil around the seedling and water it well.
D. Ongoing Care: Monitor your garden regularly, providing water, nutrients, and other care as needed to ensure the health and growth of your plants. Watch for pests and diseases, and take appropriate action to protect your plants.
Conclusion
Now that you’ve mastered the art of germinating and planting seeds, including starting seeds indoors, you’re well on your way to cultivating a thriving garden full of beautiful and productive plants. With patience, care, and a little bit of know-how, you’ll be enjoying the fruits of your labour in no time. Don’t be afraid to experiment with different seed varieties and growing techniques to find what works best for your unique garden space.